Checking the bolt fit and what to do if it doesn’t
If you are thinking about putting together a parts rifle with a used barrel, you need to fully understand this:
Anytime you are getting a barrel that has already been fit and chambered for another action, and especially when getting a barrel custom fitted to a modified action, there is absolutely no guarantee that the barrel is going to fit or headspace properly on your action. You don’t need to be a ‘smith or a machinist to safely install a barrel like this, but you do need to have a complete grasp and understanding of barrel fitting and headspace etc.
My new Dasher barrel had been custom fit and chambered by Greg Tannel for my buddy Blaine’s old “blue printed” XP-100 action. During the truing, or “blue printing” process, an action gets modified, sometimes extensively. It’s these custom modifications that are most likely to put a fly in your ointment fitting such a barrel to another action.
So… As I said at the end of part 1 in this series, a challenge was encountered. Which was, after screwing the action onto the barrel, I found that the bolt would not insert all the way.
The bolt doesn’t fit…
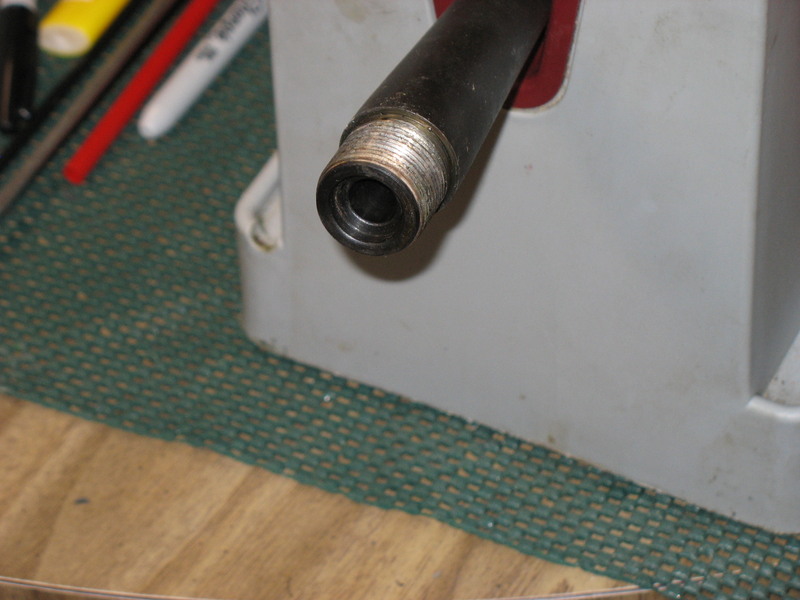
Measuring revealed that the nose of the factory bolt is larger than the counter bore in the back of the Dasher barrel. The factory bolt nose measures .695. I measured the factory take off barrel and that counter bore measures .700. The Dasher barrel counter bore measures .690. Only a few thousandths difference, here and there, but more than enough to prevent the ADL bolt from working with my Dasher barrel.
Here is a picture of the back of the factory barrel where you can see the factory counter bore:.
It is this area on the custom barrel that the bolt nose is .005 too big around to fit, preventing the bolt from inserting all the way.
When having a Remington action trued, it’s very common for the bolt nose to be turned down a bit. A good ‘smith will then put a smaller than standard counter bore in the new barrel to keep a close fit on the turned down bolt nose. So, the problem I ran into here could almost be expected when fitting a custom barrel to a factory action like this.
So… What to do?
Well, it just so happened, that as I stood there contemplating the situation, I noticed one of my .22-250AI’s that was built on one of my blueprinted 700’s was laying right there within reach. I grabbed the bolt out of it and looked, sure enough the bolt nose had been turned down. Measured it and it’s .687. Should be a nice fit for the Dasher barrel with it’s .690 counter bore! Ran that bolt into the ADL with the Dasher barrel on it and it slid home and locked up like it was meant to be there.
Here is a picture of the bolt from the blueprinted 700 where you can clearly see that the nose has been turned down.
And another picture of the same bolt inserted into the back of the factory barrel, just to show a bolt nose fitting into a counter bore.

Checking bolt fit
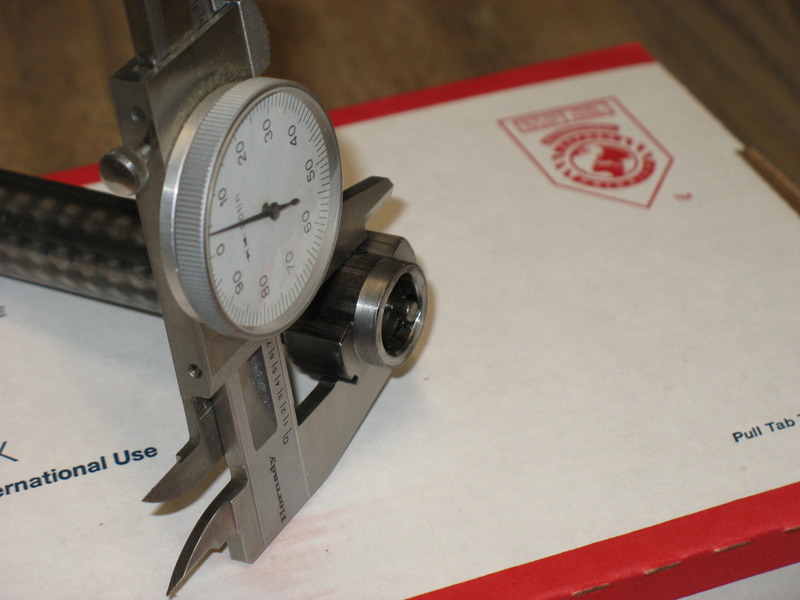
So this bolt from the other rifle closes okay, but I needed to make sure it actually “fit”. The bolt nose to counter bore fit was acceptable at .003 total clearance.
Next I checked the clearance between the end of the bolt nose and the back of the chamber and found it to be .005, which is perfect. I checked this by first removing the firing pin from the bolt so that it closes freely with no resistance. It should literally just drop closed under its own weight. Then I applied a layer of tape that is .005 thick, carefully trimmed to fit with a razor to only the very end of the bolt. And checked bolt fit with the tape in place. With the tape, the bolt now closed with just a slight drag and resistance – telling me that the .005 thick electrical tape on the end of the bolt was making light contact with the back of the barrel. Perfect!
Next I checked the headspace on one of the Dasher cases that came with rifle and found it also perfect at zero. With the tape from the previous step removed and the firing pin still removed, I simply chambered one of the cases and found the bolt closed with some very light resistance. Zero headspace, in other words. Again, perfect!
Now, had the bolt dropped closed without resistance on that case, indicating some headspace, I would have started adding layers of thin scotch tape or other shim material to the back of the case and checking feel until I determined how much “shim” was needed to take up the headspace. If it had been anything less than about .004 I’d have called it good. But more than that and I’d have had to do something. With a wildcat like the Dasher that utilizes a “false shoulder” during case forming, achieving zero headspace would have simply been a matter of lengthening the shoulder on the cases. Every situation will be different here and it’s very important that you fully understand headspace if you’re going to undertake a project like this.
But, this one was perfect, right out of the gate with no adjustment of any kind needed.
Going forward
So, I have a bolt that fits almost perfect! Which leaves me several options. I can pay to have the counter bore on the Dasher barrel opened up a few thousandths to accommodate the factory ADL bolt. Or I can have the ADL bolt nose turned down a few thousandths. Or, I can just use the bolt from the .22-250AI and share it between two rifles.
I went ahead and sent the ADL bolt to Greg Tannel and had him turn the nose down on it, so The Mongrel has its very own bolt and doesn’t need to share.
In part 3 I’ll cover finishing up the rest of the rifle including trigger, stock work and scope.
More to come…